Inexpensive Natural Recording Alternatives
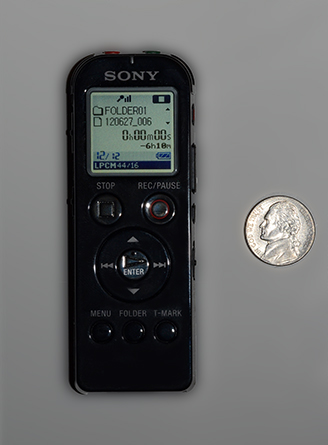
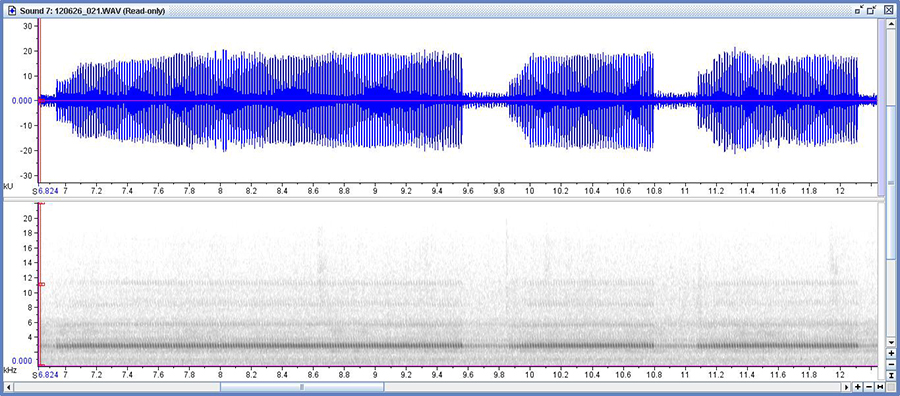
Although we use a digital audio tape recorder and Sennheiser microphones for most of our natural sound recording, we've found some nice and fairly inexpensive alternatives. These inexpensive digital recorders allow you to record a bird or frog call, download it to your computer, and then display the sonogram with free software from Cornell. While these inexpensive recorders cannot achieve the same quality as higher priced systems, they do a terrific job for the price, allowing anyone to record and display sonograms. For those doing field work it allows documentation of important species. We use these recorders in the TAMP (Tennessee Amphibian Monitoring Program) program to document new county records for frog and toad species. There is no gain control on these recorders, only a microphone sensitivity selection, so care has to be taken so that digital recordings are not clipped. But this is usually not a problem. For the highest quality, it is nice to be able to record uncompressed sound files in the .wav format. The recorder at right allows this, and you simply select the "linear PCM" recording mode to do this. The small Sony voice recorder at right does a great job of capturing natural sounds. The model number is ICD UX523, and it was used to make the recordings and sonograms below. Update December 2016: The new version of this recorder is the Sony ICD UX533. It cost around $89.00. Some of the advantages of these small recorders are: Extremely compact Has a built in USB port to allow you to transfer all recordings to your computer. Has a time stamp to digitally imprint the date and time on all your recordings Software CD included Has a voice-activated recording feature Has both low and high sensitivity microphone settings for the (very nice) built in stereo microphone. Can be used with or without a low-cost home-made parabolic microphone Can be carried in a coat pocket - allows "quick draw" recording Frequency range extends to 20,000 hz. This makes it useful for insect recordings as well, something the earlier models did not do well. Apps: If you have an iPhone, the Sonocord app is very helpful. This app is only $0.99, but it not only records, but allows you to display a sonogram and display it. It also records the time & date and the location lat/long of each recording. Very helpful and a bargain for the price. Software: Cornell's Laboratory of Ornithology has a great free software program called Raven Lite. You can download it at: www.birds.cornell.edu/brp/raven/Raven.html. This program will allow you to see and analyze your recordings and create sonograms of natural sounds (see the image below). At the Raven page, select Raven Lite, then select Raven Lite 2.0 full download for your operating system. Click on "Get a Free License" to have your license number e-mailed to you. The recorder shown above and the home made parabolic microphone described below were used to make the recording shown in the sonogram below. This is a recording of an Eastern Towhee that we made in our front yard:
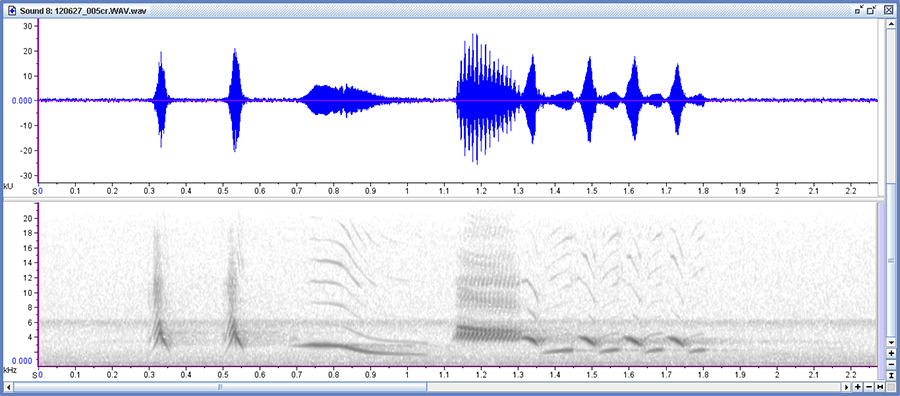
You can also use Raven Lite to slow down natural recordings so that the full complexity of a song may be heard. Listen to the complexity in the ending trill of the above towhee's song when played at 15% speed. The recorder can be used without the parabola and does quite well. For many sounds, particularly insect songs, you will probably not need or want a parabola. The recording below is of a Narrow-winged Tree Cricket recorded on June 26th, 2012, also in our front yard.
With the sonogram, you can easily find the dominant frequency of 2700 Hz and, while zoomed in, count the pulses per second. This helps greatly in identifying insect calls, or at least narrowing down the candidates. Click the sonogram above to play the call.
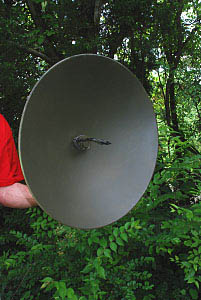
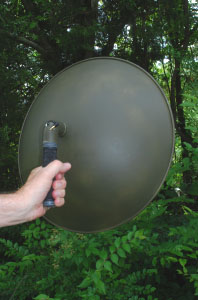
An Inexpensive Parabolic Microphone:
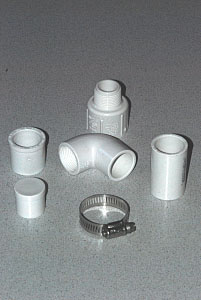
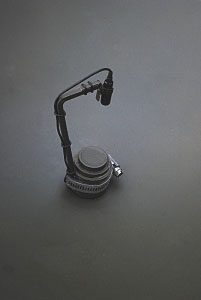
This parabolic microphone plugs directly into the microphone jack of the Sony recorder shown above. It greatly enhances the performance of the recorder, particularly for bird sounds. The total cost of all materials is less than $150.00. Note: The following project should not be attempted without adult supervision; it involves the use of an electric drill, a hacksaw, and a couple of types of glue. We cannot assume any liability for the misuse of these materials and tools or for accidents resulting from this project. So be careful! Be aware that the camouflage paint that covers the parabola is not just to make it blend in, but to dull the shiny reflective surface. Without the paint, it makes a pretty good solar oven, and your microphone, exactly at the focal point, could come out extra crispy if you point it towards the sun. Note June 29th, 2012: The Olympus microphone listed below is no longer available. Sony makes a microphone for their recorders that you can look at here. We have not tried it out. You will need to alter the mic support to fit the new microphone. All that's really important is that the microphone head be positioned 4.5 inches above the parabola, centered. The above recording of an Eastern Towhee was made by simply hand holding the recorder (mic pointing towards the parabola) at the focus point of the parabola. Materials: 18" Aluminum parabolic dish - Edmund Scientific Company: Edmund Scientific Company 18" Parabolic Reflector Price: $49.95 Olympus ME15 Electret Condenser Microphone - Amazon.com: Amazon Olympus ME15 Microphone - No longer available - see note above. Price: $22.99 Hardware: From Home Depot, the following PVC pipe fittings (plumbing dept) One each: (For detailed views of these parts, along with the part numbers, click here) 3/4" PVC Plug #449-007
$0.79 1 Can PVC pipe cement - About $4.94 Stainless steel pipe clamp 3/4" - 1-3/4" $1.15
From Home Depot, hardware dept: 3/16"x3/16" x36" long square steel bar (enough for 5 microphones) $2.65
From Home Depot, paint dept: Loctite Epoxy Gel Glue - $3.99 (enough for several microphones) Medium Sandpaper - (Varies 1 sheet will do) (enough for several microphones) Rustoleum Camouflage paint - Green - $3.67 (enough for several microphones)
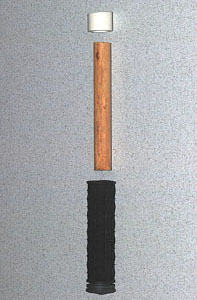
From Home Depot, Lumber dept: 3/4" round wooden dowel x 3' long - $2,59 (enough for several microphones)
From Walmart: Schwinn Bicycle Handgrips, Item no SW501, about $5.00. (makes two handles)
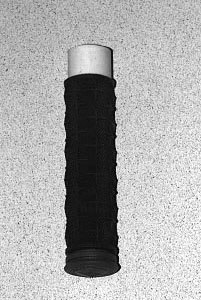
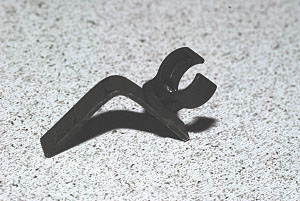
From Lowes Plumbing dept: Rubber "O" rings, Danko #47, 10 "O" rings per pack (enough for two parabolic microphones). $2.54 Total cost not including shipping cost: About $96.00 (As noted above, you can save money by building more than one parabolic microphone - this cost assumes that you don't use the extra parts (like the extra bicycle handle) for other microphones. Tools Required: Drill, 3/8" bit, Hacksaw, Flat end screwdriver, vise, file General Notes: These assembly instructions are suggestions only. We’ve made three of these parabolic microphones so far, and they all work well. However, there’s plenty of room for improvement. All that is really important in the design is that you mount the end of the microphone 4-1/2 inches above the center of the parabolic dish. If you have a better way of doing that, please feel free to experiment, and let us know how it turns out. This design emphasizes cheap materials, simple tools and is relatively easy to assemble. Preparation: Handle – See photos 4 & 5 3/4” Wooden Dowel – cut to a length where about 3/4" of the dowel projects from the inside of the handle when the dowel is fully inserted into the handle. ¾’ PVC Pipe – Cut to ¾” length
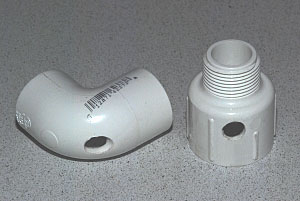
90 Degree Elbow – See photo 6
Center
punch 90 El at spot shown (roughly the center of the outside curve – the
position is not critical. Drill with 1/8” drill bit Enlarge hole with 11/32” or 3/8” drill bit (best done while clamped in vise – go slowly – the 3/8” bit will want to “grab” the soft PVC material)
Male adapter – See photo 6Center punch at spot shown, approximately 5/16" from the edge of the flange.Drill with 1/8” drill bitEnlarge hole with 3/8” drill bit (best done while clamped in vise – go slowly – the 3/8” bit will want to “grab” the soft PVC material)
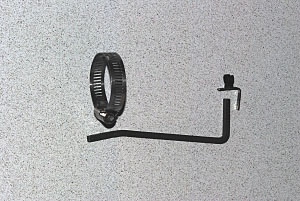
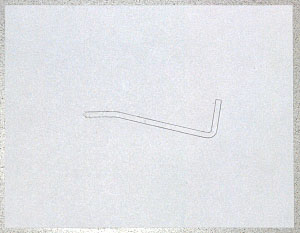
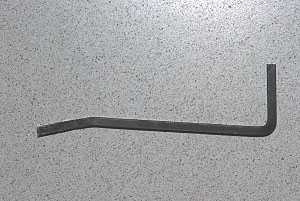
3/16 x 3/16 steel bar – See photos 9, 10 and 11 Cut to 6-1/2” length Bend to match template (use vise for best results)
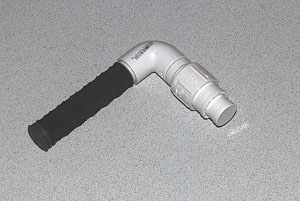
Olympus microphone holder – See photo 12 (shows holder after final bend has been made)Hacksaw off at end of flat piece, file smooth
Coupling – You will use the coupling to make a small 1/4" long spacer that goes between the 90 Degree Elbow and the Parabolic Dish. It allows you to tighten the assembly. See the PVC parts page for an image of the coupling. Hacksaw off a ¼” inch long ring – this will be a spacer.Sand smooth and flat
Paint the small parts: Mask the inside of the 90 degree elbow and male adapter, and the outside of the ¾ plug and reducer, and paint these plus the spacer. Paint microphone holder and 3/16x3/16 bar stock
Assembly:
To get an idea of how the various parts go together look at photos 7,8,9 and 13
Recording with Cell Phones: Most smart phones have imaging and recording capability built into them. Recently, one of our TAMP (Tennessee Amphibian Monitoring Program) volunteers used a cell phone to photograph an Eastern Spadefoot on a TAMP route. The photographic documentation was approved as a new county record for that species. Recordings were also submitted by cell phone. Cell phones vary widely in how these recording features are accessed, but you can try going to the "media" menu and looking for a recording or voice recording feature. You can even use the parabola described above with your cell phone. Many of the newer cell phones come with a headset. You can simply use a couple of rubber bands to bind up the earphone pieces and attach the microphone piece at the focus of the parabola. Plug the other end of the headset cord into your phone and you're ready to go! When you are finished recording, send yourself an e-mail with the recording attached. You can then open the e-mail and save the attached recording into your computer hard drive. Recordings made with my cell phone are saved as a .amr file. Happily, the Raven Lite software described above will open these files. You can do any sound editing in Raven Lite that you like (including sonograms) and then you can resave them as .wav files.
Some Helpful Links:
Overview of Sound Recording Theory: A good basic review is found in the User Guide for the Raven Lite 1.0 software. Select “Help” and then select “User Guide”.
Cornell Laboratory of Ornithology – A great resource for information about anything concerning birds.
Macaulay Library of Natural Sounds (Cornell) – The Macaulay Library of Natural Sounds is part of the Cornell Laboratory of Ornithology. See also the link below for specialized help on equipment. http://www.birds.cornell.edu/macaulaylibrary/
Recording Equipment: http://www.birds.cornell.edu/macaulaylibrary/Contribute/equipmentOverview.html
Field Techniques: http://www.birds.cornell.edu/macaulaylibrary/Contribute/fieldtechniques.html
Software: Raven Lite: http://www.birds.cornell.edu/brp/raven/Raven.html Sound Forge: http://www.sonycreativesoftware.com/soundforge
Sound Cards: M-Audio Delta 66 - http://www.m-audio.com
Tennessee Amphibian Monitoring Program (TAMP) http://www.mtsu.edu/mtsucee/tamp.shtml
Equipment Vendors:
Marice Stith
Recording Services
Full Compass
Systems
Sweetwater
|