The purpose of this feature is to give scout leaders, educators and naturalists an idea of some of the natural events coming up each month. We will try to cover a variety of natural events ranging from sky events to calling periods of amphibians, bird and mammal watching tips, prominent wildflowers and anything else that comes to mind. We will also note prominent constellations appearing over the eastern horizon at mid-evening each month for our area for those who would like to learn the constellations. If you have suggestions for other types of natural information you would like to see added to this calendar, let us know! Note: You can click on the hyperlinks to learn more about some of the featured items. To return to the Calendar, hit the "back" button on your browser, NOT the "back" button on the web page. Sky Events: Evening Sky: All 5 naked eye planets are visible in the evening sky at dusk towards the end of March. Venus is the first planet to become visible after sunset, and shines brighter than any other object in the night sky other than the moon. After being dazzled by Venus, you can turn towards the east and watch Jupiter emerge from the twilight glow. Saturn and Mars are visible all month long, and Mercury climbs into view over the western horizon during the last week of the month, reaching its greatest apparent distance from the sun on March 29th. From about the 26th of March to the end of the month is a good time to see all of the naked eye planets in the evening twilight. The view below shows a 180 degree view of the sky on the 29th, facing South. Remember this is a "fish eye" view, and, facing south, Mercury will be on your right and Jupiter on your left. The moon will be almost overhead, 80 degrees above the horizon. Besides the moon and planets, Sirius, the brightest star in the night sky, is also shown.
Begin looking around 6:30pm. Venus will be the first planet visible after sunset, and will be in the western sky. Jupiter should appear next in the eastern sky, then Sirius to the South. Mars will be the faintest planet visible and will appear last. You can use bright Venus as a guide to finding Mars - It is about 10 degrees away from Venus on the 29th. The moon should help in finding Saturn. All times noted in the Sky Events are for Franklin, Tennessee and are Central Standard Time. These times should be pretty close anywhere in the mid-state area. Constellations: The views below show the sky looking east at 9:00pm CST on March 15th. The first view shows the sky with the constellation outlines and names depicted. Star and planet names are in yellow. Constellation names are in green. The second view shows the same scene without labels. All 5 planets are visible in the early evening sky towards the end of the month. The bright star Arcturus, in Bootes, the Herdsman, makes its appearance this month in the early evening sky, a sure sign that Spring is here. Below Bootes is Corona Borealis, the Northern Crown. In the southeast, Virgo clears the horizon this month along with Corvus, the Crow. Find Denebola, the star that marks the tip of the tail of Leo, the lion. Now locate the stars Zosma and Chertan, above Denebola, which along with Denebola make a conspicuous triangle of bright stars. If you mentally draw a line from Zosma to Chertan, and extend it about one third of the distance between these two stars, you should see a faint star known as 73 Leonis (refer to the image below - unless you're looking from a dark sky location, you will probably need binoculars to see 73 Leonis.) We will use this star as the starting point of our tour through the Virgo cluster of galaxies (see Drifting Through a Galaxy Cluster, below).
Drifting Through a Galaxy Cluster: Some people who own small telescopes are discouraged in attempting to find deep sky objects like galaxies because it may involve the use of a detailed star chart showing the galaxies or a computerized "go to" telescope. This exercise is meant to allow someone with a telescope without a motor drive to get an introduction into how galaxies appear in a small telescope. It's still challenging, because galaxies are faint, and you have to be able to point the telescope at the correct star to begin. Once you do that though, you can sit back and let the earth's rotation cause your telescope's field of view to drift through the heart of the Virgo cluster of galaxies. Many of these galaxies are about 65,000,000 light years away, and in a small telescope, the challenge is to see the small faint glow of a galaxy's light against the sky background. Before you begin to observe, be sure to read Some Viewing Tips, below. Equipment required is as follows: 1. Your telescope, preferably a 60mm lens or mirror, or larger. The easiest objects to observe are the Messier objects. They are labeled on the charts and an example is M65. If you are using a small telescope you should feel very satisfied if you can just make out a few of the brighter Messier objects. Larger scopes will reveal more of the other galaxies shown. 2. A watch or stop watch. 3. The above star chart showing the star 73 Leonis, and the galaxy finder charts. Click Here to get your charts to print. 4. Your own (dark-adapted) eyes. 5. A flashlight with red cellophane (like the plastic wrapping over your Valentine's Day candy package) rubber banded over the end, to make a red flashlight. You need this to view the charts and your watch. 6. For those that have telescopes like the Edmund Astroscan that have a glass plate at the sky end of the scope, a home-made dew-cap can be made by rolling up a piece of cardboard and taping it around the tube so it projects out past the sky end of the tube about as far as the tube is wide. See Some Viewing Tips, below.
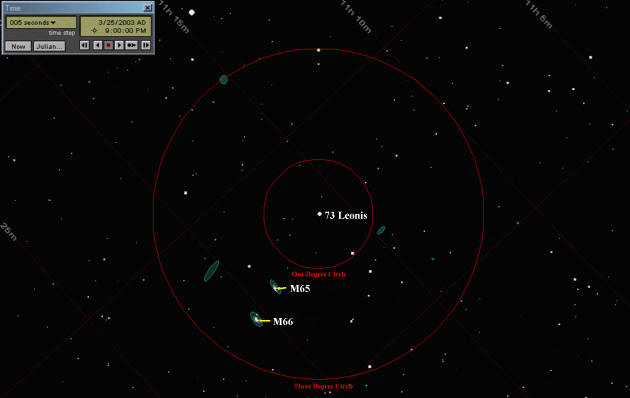
Procedure: Pick a clear night when the moon is not present in the sky. The example views were made last year and show March 25, but anytime after the middle of the month should work. If you don't mind staying up a little later, you can get better views by starting your viewing later in the evening when the galaxy cluster has risen higher in the sky. The elapsed times shown will be the same. Make sure you have all of the items listed above, including dew protection if you have an exposed front lens. Clear spring nights can produce heavy dewing conditions. Practice aiming your telescope in the daytime on a distant object. If your telescope has a finder telescope, sight it in during the day, then fine tune your aim on a bright object, like Jupiter, at night before starting this exercise. It can be very frustrating if you're not sure where you're pointing. Place a bright star (or Jupiter) in the center of your telescope's field using the lowest power eyepiece you have. If you have a motor drive, cut it off. Now measure the amount of time it takes for the star or planet to drift out of the field of view, in minutes and fractions of a minute. In other words, if it takes 4 minutes and 20 seconds to drift out, use 4.3 minutes. Dividing this number by 2 will give you the diameter of your field of view (in degrees) to compare to the illustrations below. If you timed 4.3 minutes, your field of view would be 2.15 degrees, and your field of view would be halfway between the 1 degree and 3 degree circles on the illustrations. Use the charts above to locate the star 73 Leonis. It should be visible as a faint naked-eye star. If you have difficulty seeing 73 Leonis, you may want to locate it with binoculars first. It takes a pretty dark sky to see it. The illustration below shows what you should see in your telescope, when you're pointed in the right place. Taking into account the size of your field of view, look for the patterns of stars shown in the illustration to verify your position. These illustrations show the field as it would appear to the naked eye or in binoculars. If you are looking through a reflecting telescope the image will be inverted, so turn the finder chart upside down to compare the chart to what you see in the telescope. If you are looking through a small refracting telescope with a star diagonal attached, use the finder charts right-side-up, but the image in the telescope will be a mirror image of the finder chart. The small red circle shows a 1 degree field and the large red circle shows a 3 degree field of view. In the time box in the top left corner of each illustration note I have arbitrarily chosen the date of 3/25/2003 and the start time for 9:00pm. You can do this on any date that the moon is not in the sky, and start at any time that Denebola is fairly high in the sky. Simply use your own start time and then add the same elapsed time to get your own chart times. For convenience, I show the elapsed time from the start (00:00:00) with each illustration. Point the telescope at any star in Leo and make sure that it is stable. This exercise depends on your telescope not moving during the exercise. The stars should slowly drift through the field due to the earth's rotation, but movement of the telescope (or binoculars, if you have them on a tripod) is not allowed. Be careful when returning to the telescope not to bump it. Center the star 73 Leonis and turn off your clock drive, if you have one. Note your time, or start your stopwatch as the star is centered, then let go of everything and let the earth's rotation start moving the scope. Chart One 00:00:00 (Zero Hours, Zero Minutes, Zero Seconds)
If you have a wide field telescope or binoculars, you may see M65 and M66 off center once you center the star 73 Leonis. In four minutes, these galaxies will slowly drift near the center of the field.
Chart Two 00:04:00 (Four minutes and zero seconds after start time)
The galaxies M65 and M66 will now be in the position shown. Remember, if you're using a reflecting telescope, you would turn this illustration upside down to compare. If you don't see these galaxies, you may want to make sure you do have the right star centered for 73 Leonis. Remember, these galaxies will appear as very small, faint glows. The other possibility is that you need a darker sky. Try again out in the country, far away from city lights. My notes tell me that M65 and M66 were "fairly easy" to see with a 60mm, 22 power Bushnell spotting scope from Pickett State Park. Barely visible was the third galaxy in this trio, NGC 3628, a nice "edge on" galaxy. If you can see M65 and M66, you have "calibrated" your vision for bright galaxies. Now it's time to take about a 50 minute break, in order to allow the earth to point the telescope to the Virgo Cluster. You may want to make a scrap-paper cover for the eyepiece to slow dew formation. If you come back and the eyepiece is fogged, carefully remove it (to keep from moving the scope) and hold it in front of a car heater till it defogs, then carefully replace it. You may want to spend some time reviewing the constellations, or scanning with binoculars. Don't go inside to a brightly lit room. It takes about 45 minutes to get complete dark adaptation for your eyes, and you want to be completely dark-adapted when you return to view some of the Virgo Cluster members. Chart Three 1:00:00 (One hour after start time)
If you have a large field, you may see M98 at the top of your field (remember, bottom of your field for reflectors) and M98 to the east of it. My notes show that these galaxies were "faint" in a 60mm, 22 power Bushnell spotting scope, even in a very dark sky. If you have a smaller field of view, don't move the scope! Instead, see if you can see the largest of the galaxies crossing the 1 degree field, NGC 4206. It will be quite a bit fainter than any of the Messier objects, but I was able to spot it from our farm with my 70mm Pronto telescope. It's a nice "edge on" galaxy.
Chart Four & Five 1:09:30 (One hour, 09minutes and 30 seconds after start time)
We are now in the heart of the Virgo Cluster. Messier 84 and Messier 86 should be crossing the edge of a 1 degree field. My notes show them as both "fairly easy" in the 60mm Bushnell scope at 22 power under the very dark skies of Rugby, Tennessee. If you have a 4 inch or larger scope, see how many of the galaxies in the chain of galaxies stretching out to the east (called Markarian's Chain) that you can see. Reposition your telescope to place M84 and M86 as shown in the illustration below. Watch as the bright galaxy M87, the brightest member of the Virgo cluster, drifts by. My notes show it as "easy" in a 60mm spotting scope at 22 power under the dark skies of Rugby, Tennessee.
With a 6" reflector, I'm able to see many members of "Markarian's Chain" from our farm. With a large telescope you may see all of the galaxies shown, although you will have a smaller field of view. Chart Six 1:20:05 (One hour, 20 minutes and 05 seconds after start time)
Messier objects M89, M90 and M58 drift through the field of view. My notes show M89 as "fairly easy" and M90 as "faint" in the 60mm spotting scope at 22 power. I could also see M58 in the 60mm scope but I didn't note the brightness. This ends our first tour of the Virgo cluster. Let us know how you did. If you enjoyed drifting along looking for galaxies, you may want to try to see if you can see all 110 of the Messier objects. If you do, I recommend the book, The Messier Album, by Mallas and Kreimer. It shows a photo of each object and a drawing made by using a 4 inch refracting telescope. It also has a "Checklist" section where you can record the date you saw the object, where you were, and other details. There is also a new book on the Messier objects by O'Meara that's also been well reviewed (I haven't seen it). Viewing the Messier objects is a fun undertaking, and one you can work on over a year or two, at home or on vacation. You may want to get a star atlas so you can learn to hop from star to star to locate these objects. Some Viewing Tips: 1. We can't emphasize enough the importance of a dark sky. If you live in the suburbs, you can sometimes effectively double the size of your telescope by taking it 30 miles or so away from a large city. 2. As described above, be sure to rough-align your scope during the daytime, then, before you start the exercise, fine-align it on a bright object like Jupiter. It's very frustrating if you're not sure where you are pointing. 3. Coping with Dew: Many manufacturers of small telescopes seem to pretend that there is no such thing as dew. Owners get a rude shock when after 30 minutes outside on their first clear spring night, everything starts to get fuzzy and dim. A look with the flashlight confirms that dew has covered the front lens of the scope. Its not as much a problem in reflecting telescopes or refractors with dew caps, but lens/mirror scopes can dew over very quickly. There are several solutions. The easiest is to make a dew cap out of rolled-up cardboard and let it project out as far as you can from the front of the telescope tube without cutting off some of your field of view. This will slow the formation of dew. Second, you can use a hair dryer (easy does it) to warm the lens slightly before you observe, or use the hair dryer to clear the dew once it has formed. Under a country sky and away from 110V power sources, you can use a battery operated hair dryer (plugs into your "cigarette lighter" ) or your car heater to warm the lens. If these methods do not work sufficiently, you may have to buy one of the commercial dew-prevention systems. If an eyepiece fogs, the best remedy is to carefully remove it and use the car heater to gently warm it until the dew evaporates. 4. Make sure your eyes are dark-adapted. You need to be in darkness for about 45 minutes before observing. 5. If you're having trouble seeing an object, try looking to one side of it so the image falls on the light-sensitive "rods" in your eye. Be patient - it sometimes takes a while for an object to become distinct from the background. This technique is called "averted vision". Don't try too hard or you may start seeing things with "averted imagination." 6. Another trick for seeing faint objects is to lightly tap the tube of the telescope. The motion sometimes makes faint objects noticeable. 7. Cup your hands around the eyepiece to block stray light when trying to see faint objects. I sometimes even drape a black cloth over my head (don't seal it tight, your breath will fog the eyepiece) to see very faint objects. 8. Finally, and this obviously is something that you can't do while "drifting," you can sometimes see more detail in a deep sky object by increasing the power. The eye can see faint objects more easily if they are spread out over a larger area of the retina. On Learning the Constellations: We advise learning a few constellations each month, and then following them through the seasons. Once you associate a particular constellation coming over the eastern horizon at a certain time of year, you may start thinking about it like an old friend, looking forward to its arrival each season. The stars in the evening scene above, for instance, will always be in the same place relative to the horizon at the same time and date each March. Of course, the planets do move slowly through the constellations, but with practice you will learn to identify them from their appearance. In particular, learn the brightest stars (Like Arcturus and Denebola in the above scene looking east), for they will guide you to the fainter stars. Once you can locate the more prominent constellations, you can "branch out" to other constellations around them. It may take you a little while to get a sense of scale, to translate what you see on the computer screen or what you see on the page of a book to what you see in the sky. Look for patterns, like the stars of the "Big Dipper." The earth's rotation causes the constellations to appear to move across the sky just as the sun and the moon appear to do. If you go outside earlier than the time shown on the charts, the constellations will be lower to the eastern horizon. If you observe later, they will have climbed higher. As each season progresses, the earth's motion around the sun causes the constellations to appear a little farther towards the west each night for any given time of night. If you want to see where the constellations in the above figures will be on April 15th at 9:00pm CST, you can stay up till 11:00pm CST on the March 15th and get a preview. The westward motion of the constellations is equivalent to two hours per month. A good book to learn the constellations is H. A. Rey's classic, The Stars, A New Way to See Them. Rey's depictions of the constellations and witty commentary are terrific. A good general reference book on astronomy is the Peterson Field Guide, A Field Guide to the Stars and Planets, by Pasachoff. The book retails for around $14.00. A good beginners software program for learning the night sky is the Starry Night Beginner program. Visit the Starry Night web site at www.starrynight.com The program retails for around $30.00 and contains a wealth of information.
Circumzenithal Arcs: Fall, Winter and Spring are good times to watch for these beautiful arcs that form directly overhead. We saw one in South Carolina this year on February 29th. Be sure to look upward in the late afternoon anytime you have wispy cirrus clouds in sky.
Amphibians:
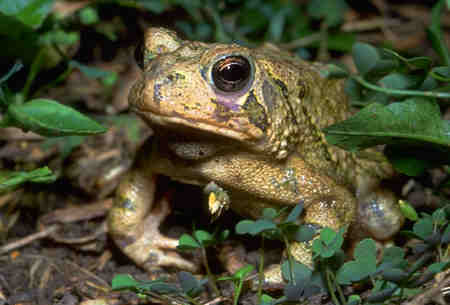
When the temperatures start to rise in March, much frog and toad song can be heard. Our Upland Chorus Frogs at the farm are calling continuously, day and night. Spring Peepers and Southern Leopard Frogs, are also already calling this year. American Toads, if you have not heard them yet, should be calling soon. Look for their eggs. In West Tennessee, Northern Crawfish Frogs give their loud snoring calls in early March. At higher elevations, listen for Mountain Chorus Frogs. Towards the end of the month listen for Pickerel Frogs doing their "yeeooow" call. Remember that on mild nights you may find frogs and toads out foraging that you do not hear until later in the season.
Birds:
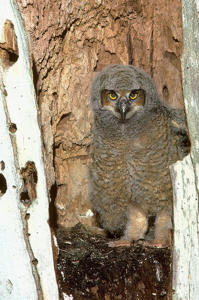
This time of year is prime time to find Great Horned Owl nests. Since the leaves have not yet appeared on most trees, you can sometimes spot the old stick nests that the owls often use for nesting. This year I spotted a Great Horned Owl on the nest on February 8th, while we were driving along the interstate. Observe only at a distance and do not try to approach a nest, both for your own safety and to keep from flushing the owl off the eggs. The adult's absence, if it flushes, can allow the eggs to rapidly get too cold, and may doom the nest. Look and listen for the young Great Horned Owls. If you find a young owl on the ground, leave it there! Its parents will feed it on the ground. Well-meaning people sometimes take young owls they find on the ground to wildlife rehabilitation centers, thinking the young owls have been abandoned. This is not necessary, and it may prevent the owl from ever successfully living in the wild. Don't do it.
Bird Finding in Tennessee, Michael Lee Bierly. A classic guide to finding birds in Tennessee. The Sibley Guide to Birds, David Allen Sibley The Sibley Guide to Birds of Eastern North America, David Allen Sibley This new Sibley Guide covers only eastern North America, is quite compact, and is less expensive than the larger Sibley. An inexpensive guide for beginners is the Golden Guide for Birds.
Archives (Remember to use the back button on your browser, NOT the back button on the web page!)
Natural Calendar
February 2004
Natural Calendar
December 2003
Natural Calendar
November 2003
Natural Calendar
September 2003
Natural Calendar
February 2003
Natural Calendar
December 2002 Natural Calendar November 2002
Nature Notes Archives: Nature Notes was a page we published in 2001 and 2002 containing our observations about everything from the northern lights display of November 2001 to frog and salamander egg masses. All Photographs © 2004 Leaps Night scenes prepared with Starry Night Pro software
|
||||||||||||